Showing posts with label quick. Show all posts

Sunday, 1 February 2015

How to Draw Braids (Colour Pencil)


Hello internet lovelies! I've got another drawing tutorial this week; braids. So, like always, before we begin gather up a few things;
  • Pencil (HB will do for now),
  • Set of colour pencils (ensure the set includes a range of brown shades),
  • Rubber,
  • Sharpener,
  • Good quality paper/ Sketch pad.

(Click to enlarge images)
 
Firstly, I have no idea why this image is so dark yet the rest are fine- sorry. Anyway, lightly draw or sketch a line around a similar length to what you would like your braid drawing to be. Begin to draw leaf shapes from this central line (See image above) on both sides. These will be your basic outlines for shading and adding tone. Continue to draw these down the original line, becoming slightly small each time.

 
Finish off your basic sketch by drawing a bobble and hair at the end. Take the following coloured pencils ready to begin adding tone; medium brown, dark brown, reddish brown and black.
 
Use the medium brown to add a base tone to the plait/braid, ensure that the tone is darker at the corners; do this by pressing harder on the pencil and shading in the direction of the hair (It's a good idea to look at an image for this).
 
Next apply the dark brown ONLY around the darker areas of tone, again using shading to mimic the direction of the hair.
 
 
Then, use the reddish brown and shade the area where the dark and medium brown tones meet. This will add new colour into the braid and reduce the overall saturation.
Next add the black, shade only in the very darkest places and use this colour with caution. Too much black is hard to undo with a rubber! Add the black in the corners and around the edges. Continue to shade each plait individually until it looks like this:

 
And, VOILA! You've drawn yourself a realistic looking plait in around 20 minutes!
 
Why not experiment with more exotic colours?

 
Hope you enjoyed this weeks quick tutorial! Please share and follow me on my social media, the support really is appreciated! :) x

Wednesday, 7 January 2015

Hints and Tips for New Bloggers

 
Hi internet lovelies! In this post I'm going to share a few hints and tips that I've learnt over the 6 months that I have been blogging (wow, that time has flown by), and seeing as this was my 50th post- it seemed fitting. I know that this isn't really a usual post from me, which is why I'm posting this in the middle of the week, anyway lets begin: 
 
(Yes these are from my blog notebook, maybe I'll do some of these in the future;)
 
1. Content; Your content is the most important part of your blog, if your content is: a. informative and well executed, b. easy to read, c. engaging, and d. contains good grammar your onto a good start.
Good posts also contain media in order to separate long text and make your blog more visually appealing.
 
Ensure that you post regularly- that could be daily or weekly. Maybe set aside a specific day so your readers know when to check for new posts.


   2. Photographs; You should include photographs as part as extra media. If your a craft blogger or Fashion blogger these become very important for expressing instructions and/or displaying a product in your post.

Photographs should be taken with a decent camera under NATURAL light (Natural light shows true colour and ensures that your images are graphically clear, and can be edited to a high quality. Personally I use two apps found on the apple app store: PicLab and Vintque.


3. Search Engine Optimisation (SEO); SEO is basically the way you label your posts in order to get recognised by search engines such as Google. Don't get too carried away when labelling posts as you could end up having a post that is ignore by the search engine all together!

 
4. Promotion; This is just as important as your blog posts themselves. In order to get readers and subscribers you need to place your blog out there. Create new social media accounts and try to advertise your posts- hash tags are a blessing for bloggers as they introduce people that do not necessarily follow you, to your page.
 
(Personally, I'm probably guilty of not doing this enough on twitter or Facebook!)


5. Design; This is a pretty simple one. It's important to make your blog look clean so that your content really shines- busy backgrounds and wacky colours can detract from the basic ideas of your blog. This is all about first impressions!
 
 Free and Paid for templates are available to add to your blog however its quite easy with a bit of knowledge to make your blog look clean and sleek without shedding a penny (or cent, depending where your from!).


Hope you enjoyed these quick tips for new bloggers. I feel very proud of what this blog has currently achieved, recently we hit 4,000 page views! WOW! My DIY Denim phone case tutorial has also been featured on totallygreencrafts.com  have a look!
 
Thank you all for the much appreciated support! Subscribe to my social media to be updated with new posts! Keep the Creative Juices Flowing! x


Thursday, 1 January 2015

DIY Up-Cycled Denim Phone Case


Hello everyone! Hope you all had a fabulous new year! Here is a really quick, easy DIY idea/tutorial that ensures you can up cycle your old jeans into a new, useful phone case. (Sorry in advance for the bad images, as they aren't very informative.)

Before we begin there are a few things you will need;
~Old Jeans,
~Sewing Machine/ sewing needle and thread (if you're hand sewing),
~Additional embellishments (e.g. Ribbon, lace, etc.)


So, to begin; take your old jeans and fold over one leg edge. Place your mobile device over the top and cut the bottom off of the jean leg (if you wish, you could make a pattern for more accurate measurements, however I decided to spontaneously do this tutorial). This will be the length of your phone case, make sure you do not cut to close to your mobile device as it is easier to remove material later then to add it.


Next, unfold the leg edge and separate into two sections by cutting down the two seams of the jeans. You could make two phone cases at this point, as you will only use one of the two sides.


After that, take some lace or ribbon of your choice and measure the same length as the original seam of the jeans and pin over the top and sew.

 
Then refold the edge over and sew both along the top and again along the lace/ribbon.


Fold the phone case in half with the inside showing and remove any excess material by cutting. Place your mobile device on top before pinning the edges ready to sew.


Finally, sew all seams, remove pins and turn inside out. Ensure your mobile phone fits in and there you have an up cycled denim phone case that looks great and was easy to create!


Happy New Year, what are your New Years resolutions? Comment some of them, I'd love to hear them! Hope you enjoyed this tutorial!! If you did please comment, share and follow me on my social media to stay up-to-date with new posts! Keep the Creative Juices Flowing! Enjoy!x

Sunday, 7 December 2014

Last Minute Christmas Crafty Ideas


Hi Everyone! I'm here to help with some last-minute, forgotten DIY present and decoration ideas. In total, after rummaging through Pinterest I found 8 really neat crafty ideas for this winter holiday. So, let's begin...


Firstly, DIY lippy (Lip Balm), I'm in love with the idea of making your own cosmetics, and making them look stunning with personalised labels and would be really nice to give away as a homemade Christmas gift! They're so cute! Might have to make some myself! They're especially great in these winter months when everyone's lips start cracking and really are an essential.


Next, here is another DIY gift idea. Why not take a plain white mug and personalise it using either a marker pen or a sharpie. The great thing about sharpies, is that they come in an array of colours- so get experimenting, then give them as a loving present.


Thirdly, I have found some paper craft ideas. These cards are absolutely adorable and would look stunning on a fireplace next to some Christmas stockings! They are also relatively easy, and could again be personalised. The name tags could be made from bits and bobs lying around the house- yet they still look really beautiful!


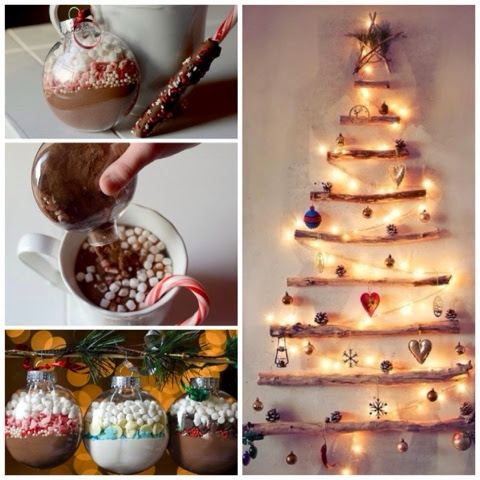
I am in love with the next two decorative ideas; a hot chocolate bauble and Christmas tree shelves. To create the bauble, simply fill a clear bauble with coca powder, marshmallows and other deliciousness and replace the top. Hang on your tree and enjoy whenever you wish! The Christmas tree may not be as easy to recreate- however it does give you some inspiration and ideas for decorations.


Finally, no Christmas is complete without a DIY snow globe- maybe place in a tree, snowman or reindeer into an old jar? Another warming gift idea; crochet infinity scarf! They're all in fashion and are great to create yourself!

And there we go! 8 Christmassy DIY ideas! Merry Christmas or as they say in the USA: Happy Holidays! Remember to comment, share and follow this blog on all of my social media, it really is appreciated! Keep the Creative Juices Flowing! :)x

Disclaimer: Please note that the ideas featured in this post were all found on Pinterest- however I am in no way affiliated with the site and or other similar corporations. These were all crafts in which I wished to share, as I felt they were good inspiration and ideas.

Sunday, 23 November 2014

DIY Dream Catcher Necklace


Hi internet lovelies! Me again! Recently I've been inspired by my love for dream catchers- I have no idea why, but they're just so beautiful! So to start making a Dream Catcher necklace you will need a number of things;
~A hoop or ring of some kind; If you can't find one, make one out of wire like me!
~Embroidery thread, if you have none normal thread and string work just as well.
~A needle,
~Decorative items like beads and feathers come in handy!


If, like me, you are using wire instead of a hoop; take your wire and bend it around an everyday object (hairspray bottle, makeup bottle...etc). Use round nose pliers to slightly bend both ends into a half circle and interlock together (like a chain). Crimp, using the same pliers for strength.

To begin take your embroidery thread, and thread through your needle.


Next loop the thread over and under the circumference of your hoop. Bring the needle back through the thread that makes the first part of your dream catcher (pictured below), and pull to tighten the loop.


Continue to to this all the way around the circumference of your hoop, making the distance between each loop as even as you can.


Once you have gone all the way around, continue to do the same thing, but using the lines created just. Try to position these next loops in the centre of each of the thread lines.


After that simply continue again, until you reach the centre.


At this point you could add a bead or charm. I decided to add a pearl. Thread the bead onto your needle and secure it into place using a double knot on the back side of your dream catcher.


Your dream catcher is nearly finished! Simply add embellishments to the bottom and add jewellery components, to create your finished necklace! 


Hope you enjoyed this tutorial! Please comment, share and subscribe it's greatly appreciated! Sorry that there wasn't a post last weekend as I was at the Harry Potter Warner Bros. Studio Tour, and pictures should be up shortly! Keep the Creative Juices Flowing! Enjoy! ;) x

Friday, 24 October 2014

DIY Polymer Clay Unicorn


Hello everyone!! I'm here with a new tutorial- make your own polymer clay unicorn! 
Before we start there are a few things you'll need;
~White Polymer Clay (Fimo or Sculpey either will do),
~Pink, Blue and purple polymer clay (these three colours can be any really, these are just the ones that I used in this tutorial),
~Acrylic paint white and black,
~Tools (eg. Exacto knife, rolling pin etc...).


Roll out a large ball of white clay- as this will be your main unicorn body. Also roll out three smaller balls from the other colours of clay that you chose.


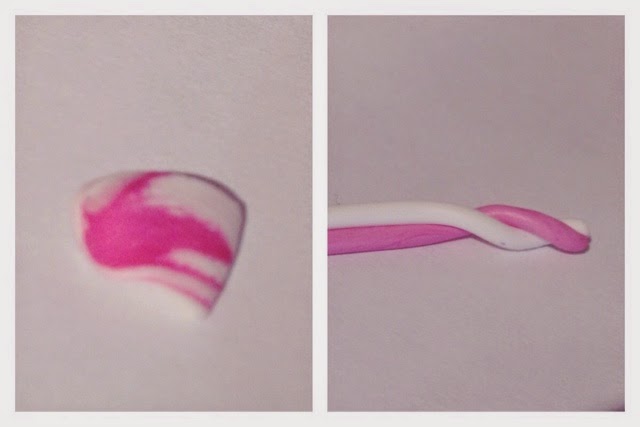
Mix pink clay and white together in order to lighten the colour. Then cut another smaller piece of white clay and roll both out Ito a sausage shape. Twist them together like in the image above (this will be the unicorn horn) and cut at a point where the horn will look like a cone shape.
 

Next take about just under half of your white clay, roll into a ball and sculpt so that one end is thinner and more pointed than the other. Add your unicorn horn on top by pressing firmly (make sure you don't squash your creation at this stage).


After that start on the body. Take most of your remaining clay (leave enough for arms and legs) and shape so that, like the head, one end is thinner than the other - make sure that both ends are flat. Add the head to the top of the thinnest side.


Roll out the remaining white clay into a sausage and cut into 4 appropriate lengths. Position them onto the body as shown above.


Once you have done that begin to add hair strands of rolled up clay onto the head and gently curve round to give the impression of waves in the hair. Use your coloured clay to do so.


Once you have completed the hair your unicorn is ready to go in the oven and bake! Make sure your happy with it and follow the instructions on your packaging. Add eyes using acrylic paint and voila!! 

Hope you enjoyed this tutorial, it's been a while since I uploaded a polymer clay tutorial! Sorry about the dust on the white clay on the pictures, it can't really be helped. See you next time, keep the creative juices flowing! ;)

Monday, 20 October 2014

Harry Potter Inspired Rings


Hello everyone, I'm back with another post- how to make your own harry potter inspired wire ring! Next month I will be visiting the Harry Potter Warner Bros studios in London.....As you can probably guess I'm very excited, and will be uploading a few more posts.
So, before we begin you will need;
~Wire of a decent thickness (any colour you like),
~Scissors,
~Round Nose Pliers.


Cut around 10-15cm of wire, you will have a lot of excess, however this can be used in future craft projects. After all it's better to have more than enough, rather than to run out mid-creation.


Take one end of your wire and produce a circular shape, by bending the wire twice around the thickest part of you pliers.


Next, take your pliers and bend the next length of wire half way around the smallest part of the plier nose- this will create the nose piece of Potter's glasses.


After that, make another circular loop by bending- try to keep it around the same/similar size to the first one.


Next bend the remander of the wire around to create the final ring shape. Then loop around the other side of the glasses and pinch into shape. If you want to add Harry's Scar simply twist and bend the wire as shown in the image below. (You can tell I got slightly carried away, as I also drew a smiley on my thumb!) :)


Hope you enjoyed this quick tutorial- it's been a while! Keep the Creative Juices Flowing and don't forget to add me on my social media, or comment on these tutorials, all support is greatly appreciated. Thanks again!x
 
(Also thank you so much for 3,000 page views! It's incredible! Had no idea, that my blog would ever get anywhere near that! ;) x)