Showing posts with label pencil. Show all posts

Sunday, 1 February 2015

How to Draw Braids (Colour Pencil)


Hello internet lovelies! I've got another drawing tutorial this week; braids. So, like always, before we begin gather up a few things;
  • Pencil (HB will do for now),
  • Set of colour pencils (ensure the set includes a range of brown shades),
  • Rubber,
  • Sharpener,
  • Good quality paper/ Sketch pad.

(Click to enlarge images)
 
Firstly, I have no idea why this image is so dark yet the rest are fine- sorry. Anyway, lightly draw or sketch a line around a similar length to what you would like your braid drawing to be. Begin to draw leaf shapes from this central line (See image above) on both sides. These will be your basic outlines for shading and adding tone. Continue to draw these down the original line, becoming slightly small each time.

 
Finish off your basic sketch by drawing a bobble and hair at the end. Take the following coloured pencils ready to begin adding tone; medium brown, dark brown, reddish brown and black.
 
Use the medium brown to add a base tone to the plait/braid, ensure that the tone is darker at the corners; do this by pressing harder on the pencil and shading in the direction of the hair (It's a good idea to look at an image for this).
 
Next apply the dark brown ONLY around the darker areas of tone, again using shading to mimic the direction of the hair.
 
 
Then, use the reddish brown and shade the area where the dark and medium brown tones meet. This will add new colour into the braid and reduce the overall saturation.
Next add the black, shade only in the very darkest places and use this colour with caution. Too much black is hard to undo with a rubber! Add the black in the corners and around the edges. Continue to shade each plait individually until it looks like this:

 
And, VOILA! You've drawn yourself a realistic looking plait in around 20 minutes!
 
Why not experiment with more exotic colours?
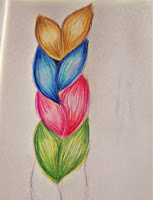
 
Hope you enjoyed this weeks quick tutorial! Please share and follow me on my social media, the support really is appreciated! :) x

Sunday, 18 January 2015

How to Draw an Eye


Hi internet friends! Today I'm here with a new drawing tutorial..... How to draw an eye! So first things first, you will need a few pieces of equipment (obviously some are optional):
-Colour Pencils,
-Small Blending Stump (could use cotton wool bud or even a tissue),
-Sharpener,
-Rubber (for any mistakes),
-Good Quality Sketching Paper,
-Electric Rubber (Also optional, used for highlighting),
-Image Reference.


To begin, draw a light, basic sketch of an eye. Remember the corner, water line and eye lid (1).
 
Take your peach (skin colour) pencil and go back over the vague pencil outline (2).
 
Take the pink and colour the corner; add darker tones around the edges by adding more pressure. Then take a dark brown and again, draw around the basic outline. Use to darken the pink, begin adding tone to the top edge of the corner of the eye (3).
 
Next, use the dark brown (or blue, green etc. for different eye colours), and shade the iris. Utilise the black pencil to colour the pupil, do this in a circular motion for best results (4).

 
After that use a blending stump (or cotton wool bud) to blend the brown in the iris, so that there is no white from the paper, and is a good base to begin with (5).
 
Take your black pencil and shade from the outside of the iris. (The very edge should be dark and then gradually fade into about half way of the radius.) Use both your green and black pencil to add details into the eye, by drawing quick lines from the pupil of the eye (6).
 
Next, use your electric rubber and add realistic highlights; look to your image for reference. Also, take a light blue pencil and shade the edges of your eye- this will give dimension to the eye ball itself(7).
 
After that, take a pink, purple and dark brown. Use these colours to add tone around the outside of the eye. Use the pink under the eye and the brown and purple on the eye lid. Darker tones should be situated close to lines and then blended out (8).


Finally, use a sharp black pencil and redraw the basic outline of the eye. Add eyelashes by using angled strokes.
 
Hope you enjoyed this quick tutorial! Please comment, share and follow me on my social media- it's much appreciated! Keep the Creative Juices Flowing! :) x