Sunday 15 February 2015

Little Jewellery Chest DIY


Hi everyone! I'm here with a new tutorial, a mini jewellery chest. After a good hunt around my local Hobby Craft I bought a few things ready for this little project of mine;
- A Paper Mache Chest,
-Decopatch Paper of my choice,
-Decopatch Glue,
-Paint Brush,
-Lace/ribbon.


Firstly, I coated an area of my chest in decopatch glue, and tore my paper into small squares (your can also cut if you want to be precise, but the overall finish in no different).


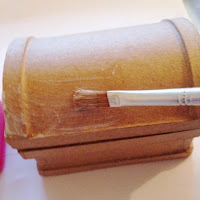
Then I applied my paper square and added another layer of glue on top using the brush to smooth out any corners/ edges.
 
I continued to 'decopatch' all over my object until it was completely covered in paper.
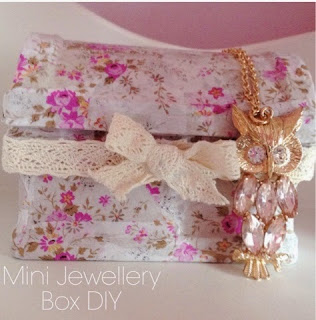
Finally, decorate how ever you want. I added a lace border and bow to the front!
 
Hope you enjoyed this quick DIY tutorial, remember to follow me via my social media links and comment if you liked this post- it's really appreciated! Keep the Creative Juices Flowing! :) x



Monday 9 February 2015

February Crafty Ideas and Inspiration

Hi internet lovelies!
Recently I have not posted any inspirational posts, so I took to Pinterest and have decided to share some of my recent finds that have made my creative intuition giddy with excitement! For this post I have tried to find the original links to these ideas and products, click on the images to open the links).
 
http://www.anthropologie.com/anthro/product/33207911.jsp?cm_vc=SEARCH_RESULTS&cm_mmc=LS-_-Affiliates-_-QFGLnEolOWg-_-1&utm_medium=QFGLnEolOWg&utm_source=AFFILIATES&utm_content=QFGLnEolOWg&siteID=QFGLnEolOWg-9pWEKoD4a8yEGrQZs9NgDg#/
 
First pin, a hand painted globe I am in absolute love with these! Why has no one done this before, think I might need to try a DIY one my self. Their vintage flair and elegant designs are so beautiful, imagine placing one of these on your bookshelf! These are available at anthropologie (click the image to find the original link).
 
 
https://www.etsy.com/listing/189964028/henna-on-canvas?utm_source=Pinterest&utm_medium=PageTools&utm_campaign=Share
 
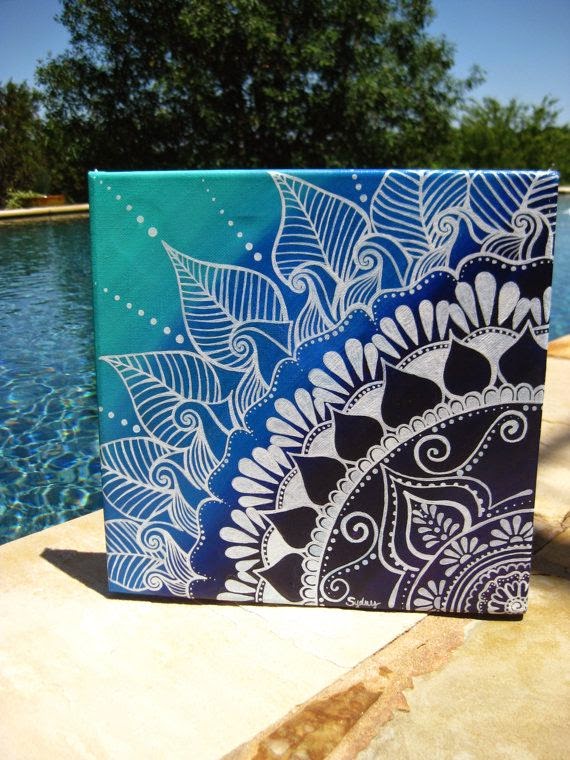
Secondly, I'm in love with this henna patterned canvas in blue. A lot of my inspiration comes from these types of Indian patterns, as they're stunning and delicately detailed. The great thing about this idea is that by using acrylic paint on canvas you could use any colours or patterns you wish. This image is linked to etsy.
 
 
http://stringartdiy.com/
 
String Art has been something on my DIY to-try list for a while, they take quite a while to do but the results are incredible. For those of you who have not come across string art, the idea is that you pin nails to a wooden board in a specific design/pattern and intertwine coloured string/thread around the nails in order to create your wall decoration.
 
 
Hope you enjoyed this post sorry it didn't have many ideas in, these are just the ones that make me very, very excited and inspired- there are plenty more unique ideas around the interweb so be sure to check some out! Keep the Creative Juices Flowing! Enjoy! :) x
 
Disclaimer: I am in no way affiliated with any sites mentioned or linked in this post, and I do not intend to infringe copyright. All opinions and views are my own. Thank you.


Sunday 1 February 2015

How to Draw Braids (Colour Pencil)


Hello internet lovelies! I've got another drawing tutorial this week; braids. So, like always, before we begin gather up a few things;
  • Pencil (HB will do for now),
  • Set of colour pencils (ensure the set includes a range of brown shades),
  • Rubber,
  • Sharpener,
  • Good quality paper/ Sketch pad.

(Click to enlarge images)
 
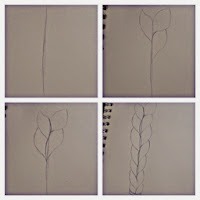
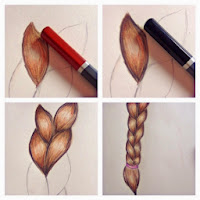
Firstly, I have no idea why this image is so dark yet the rest are fine- sorry. Anyway, lightly draw or sketch a line around a similar length to what you would like your braid drawing to be. Begin to draw leaf shapes from this central line (See image above) on both sides. These will be your basic outlines for shading and adding tone. Continue to draw these down the original line, becoming slightly small each time.

 
Finish off your basic sketch by drawing a bobble and hair at the end. Take the following coloured pencils ready to begin adding tone; medium brown, dark brown, reddish brown and black.
 
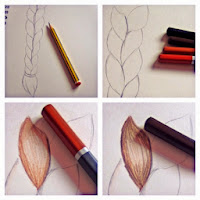
Use the medium brown to add a base tone to the plait/braid, ensure that the tone is darker at the corners; do this by pressing harder on the pencil and shading in the direction of the hair (It's a good idea to look at an image for this).
 
Next apply the dark brown ONLY around the darker areas of tone, again using shading to mimic the direction of the hair.
 
 
Then, use the reddish brown and shade the area where the dark and medium brown tones meet. This will add new colour into the braid and reduce the overall saturation.
Next add the black, shade only in the very darkest places and use this colour with caution. Too much black is hard to undo with a rubber! Add the black in the corners and around the edges. Continue to shade each plait individually until it looks like this:

 
And, VOILA! You've drawn yourself a realistic looking plait in around 20 minutes!
 
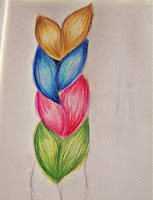
Why not experiment with more exotic colours?

 
Hope you enjoyed this weeks quick tutorial! Please share and follow me on my social media, the support really is appreciated! :) x