Showing posts with label tutorial. Show all posts

Sunday, 1 February 2015

How to Draw Braids (Colour Pencil)


Hello internet lovelies! I've got another drawing tutorial this week; braids. So, like always, before we begin gather up a few things;
  • Pencil (HB will do for now),
  • Set of colour pencils (ensure the set includes a range of brown shades),
  • Rubber,
  • Sharpener,
  • Good quality paper/ Sketch pad.

(Click to enlarge images)
 
Firstly, I have no idea why this image is so dark yet the rest are fine- sorry. Anyway, lightly draw or sketch a line around a similar length to what you would like your braid drawing to be. Begin to draw leaf shapes from this central line (See image above) on both sides. These will be your basic outlines for shading and adding tone. Continue to draw these down the original line, becoming slightly small each time.

 
Finish off your basic sketch by drawing a bobble and hair at the end. Take the following coloured pencils ready to begin adding tone; medium brown, dark brown, reddish brown and black.
 
Use the medium brown to add a base tone to the plait/braid, ensure that the tone is darker at the corners; do this by pressing harder on the pencil and shading in the direction of the hair (It's a good idea to look at an image for this).
 
Next apply the dark brown ONLY around the darker areas of tone, again using shading to mimic the direction of the hair.
 
 
Then, use the reddish brown and shade the area where the dark and medium brown tones meet. This will add new colour into the braid and reduce the overall saturation.
Next add the black, shade only in the very darkest places and use this colour with caution. Too much black is hard to undo with a rubber! Add the black in the corners and around the edges. Continue to shade each plait individually until it looks like this:

 
And, VOILA! You've drawn yourself a realistic looking plait in around 20 minutes!
 
Why not experiment with more exotic colours?

 
Hope you enjoyed this weeks quick tutorial! Please share and follow me on my social media, the support really is appreciated! :) x

Thursday, 1 January 2015

DIY Up-Cycled Denim Phone Case


Hello everyone! Hope you all had a fabulous new year! Here is a really quick, easy DIY idea/tutorial that ensures you can up cycle your old jeans into a new, useful phone case. (Sorry in advance for the bad images, as they aren't very informative.)

Before we begin there are a few things you will need;
~Old Jeans,
~Sewing Machine/ sewing needle and thread (if you're hand sewing),
~Additional embellishments (e.g. Ribbon, lace, etc.)


So, to begin; take your old jeans and fold over one leg edge. Place your mobile device over the top and cut the bottom off of the jean leg (if you wish, you could make a pattern for more accurate measurements, however I decided to spontaneously do this tutorial). This will be the length of your phone case, make sure you do not cut to close to your mobile device as it is easier to remove material later then to add it.


Next, unfold the leg edge and separate into two sections by cutting down the two seams of the jeans. You could make two phone cases at this point, as you will only use one of the two sides.


After that, take some lace or ribbon of your choice and measure the same length as the original seam of the jeans and pin over the top and sew.

 
Then refold the edge over and sew both along the top and again along the lace/ribbon.


Fold the phone case in half with the inside showing and remove any excess material by cutting. Place your mobile device on top before pinning the edges ready to sew.


Finally, sew all seams, remove pins and turn inside out. Ensure your mobile phone fits in and there you have an up cycled denim phone case that looks great and was easy to create!


Happy New Year, what are your New Years resolutions? Comment some of them, I'd love to hear them! Hope you enjoyed this tutorial!! If you did please comment, share and follow me on my social media to stay up-to-date with new posts! Keep the Creative Juices Flowing! Enjoy!x

Sunday, 23 November 2014

DIY Dream Catcher Necklace


Hi internet lovelies! Me again! Recently I've been inspired by my love for dream catchers- I have no idea why, but they're just so beautiful! So to start making a Dream Catcher necklace you will need a number of things;
~A hoop or ring of some kind; If you can't find one, make one out of wire like me!
~Embroidery thread, if you have none normal thread and string work just as well.
~A needle,
~Decorative items like beads and feathers come in handy!


If, like me, you are using wire instead of a hoop; take your wire and bend it around an everyday object (hairspray bottle, makeup bottle...etc). Use round nose pliers to slightly bend both ends into a half circle and interlock together (like a chain). Crimp, using the same pliers for strength.

To begin take your embroidery thread, and thread through your needle.


Next loop the thread over and under the circumference of your hoop. Bring the needle back through the thread that makes the first part of your dream catcher (pictured below), and pull to tighten the loop.


Continue to to this all the way around the circumference of your hoop, making the distance between each loop as even as you can.


Once you have gone all the way around, continue to do the same thing, but using the lines created just. Try to position these next loops in the centre of each of the thread lines.


After that simply continue again, until you reach the centre.


At this point you could add a bead or charm. I decided to add a pearl. Thread the bead onto your needle and secure it into place using a double knot on the back side of your dream catcher.


Your dream catcher is nearly finished! Simply add embellishments to the bottom and add jewellery components, to create your finished necklace! 


Hope you enjoyed this tutorial! Please comment, share and subscribe it's greatly appreciated! Sorry that there wasn't a post last weekend as I was at the Harry Potter Warner Bros. Studio Tour, and pictures should be up shortly! Keep the Creative Juices Flowing! Enjoy! ;) x

Tuesday, 4 November 2014

Harry Potter Polymer Clay Tutorial


Hello internet lovelies! Today I'm posting a new Polymer Clay tutorial- now I know its not a weekend, but I really wanted to post this as soon as possible. So lets get started...
 
There are a few things that you will need however, before we begin:
~Polymer Clay (Fimo or Sculpey will do) in Translucent, pale peach, black, grey, brown, white and any other colours you may need if your adding other details,
~Tools, in order to help you model and cut the clay,
~Wire (any colour will do),
~Eyepin and other jewellery components.


To start take your peach and translucent clay and mix into quite a large ball. Try not to get many dust fibres on the clay, as they are easily noticeable. This ball will be Harry's head.

 
Next take your grey clay and mix with a SMALL amount of the black clay (if too much is added the grey will also become black), in order to slightly darken it. Roll the new colour into a thick, short sausage with flat ends and attach to the head.


After that add legs using the same grey colour, by rolling into smaller, thinner sausages. Attach these to the bottom of the body, and make sure that they're in proportion!


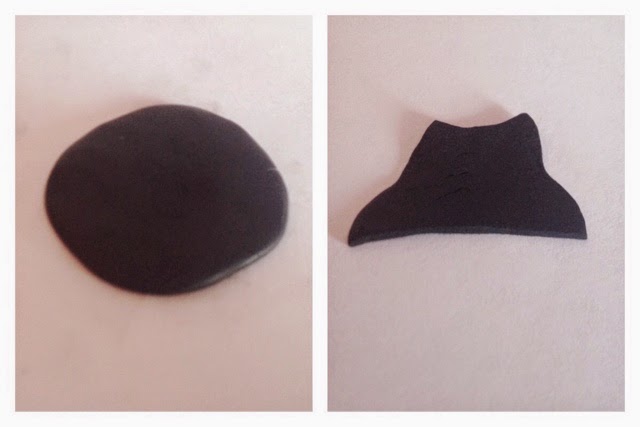
Time to make the robe... Take the black clay and flatten into a pancake. Cut a sort of trapezium shape as pictured above, with the bottom being longer than the top.


Then position onto Harry's body. Add arms to the robe, also using black clay and roll small peach balls as the hands. The body now has its shape.

 
Before you bake, add details such as brown shoes and a Gryffindor tie (Mine wasn't really a success!), glasses (bent wire), a collar out of white clay, and also the hair. When doing the hair its a good idea to look at an image; this ensures that the direction is as accurate as possible.


Once your character has baked add eyes, a mouth and Harry's scar using black and white acrylic paint. I also added small wands and harry potter books using this post here.
 
Hope you enjoyed this tutorial! I also did a Ron and Hermione, pictured below. Please share and comment if you enjoyed, its greatly appreciated. Keep the Creative Juices Flowing! See you very soon! :)

Friday, 31 October 2014

DIY Notebook


Hello internet lovelies!! I've got another tutorial this week- DIY notebook, with an idea to "cheat" book binding without thread!
Before we start you will need a few things that you will probably find around the house in your craft supplies;
~Hot Glue Gun,
~Glue Sticks,
~A wad of paper (whatever size you would like I use A4),
~Cardboard (any thickness will do),
~Fabric of your choice (this will be the cover so choose wisely!)
~Embelishments of your choice,
~Large paper clip (not completely necessary but it helps).


So to begin take your wad of paper, this can be as many or as little as you want, and begin to fold in half. I used A4 sheets so my final notebook is aproxiamately A5 size- keep this in mind when choosing your paper size.


After that group the folded edges together and use the paper clip to keep all of the sheets in position. Make sure that you don't push the paper clip all of the way down, else the paper will scratch when it is removed.


After that take your glue gun and melt glue over the folded edges. This can be done by applying in a zigzag motion and then spreading out over all pages. Make sure that you hold the edges close as you do this to ensure the best final result.


If you would like a bookmark/page marker, glue a ribbon onto the spine. Make sure that the ribbon is quite long (at least double the length of the spine) to ensure that the bookmark reaches the ends of the pages.


Next measure your paper pages and cut out 2x cardboard rectangles. These should be approx 5mm bigger than the sheets as these will be your outer covers. Also cut a cardboard spine, about the same size as the glued one. Cut your fabric to an appropriate size leaving a large border around the edge.

After than lay them out, as pictured below over your fabric and glue into position. Fold the border of the fabric and glue to the cardboard rectangles.


Then glue your paper pages onto place by glueing both the paper and cardboard spines together, hold into place until dry and secure. This step may take quite a bit of glue and patience in order to keep in position, however the results are impressive.


Once you have finished the main body of your notebook, take some spare scrapbooking paper, cut to size and glue over the rough edges of the fabric boarder, and the first page. This just adds a more professional look the the final product, and also adds some strength. However it is optional.


Finally add your chosen embellishments onto the front cover and fill with all sorts of ideas and jottings! Enjoy! Hopefully you enjoyed this tutorial, if so please share and comment, it's really appreciated. Also tweet me some of your notebooks via my social media to the top left colomn of my blog, I would love to see some! Keep the creative juices flowing! :) 


Monday, 20 October 2014

Harry Potter Inspired Rings


Hello everyone, I'm back with another post- how to make your own harry potter inspired wire ring! Next month I will be visiting the Harry Potter Warner Bros studios in London.....As you can probably guess I'm very excited, and will be uploading a few more posts.
So, before we begin you will need;
~Wire of a decent thickness (any colour you like),
~Scissors,
~Round Nose Pliers.


Cut around 10-15cm of wire, you will have a lot of excess, however this can be used in future craft projects. After all it's better to have more than enough, rather than to run out mid-creation.


Take one end of your wire and produce a circular shape, by bending the wire twice around the thickest part of you pliers.


Next, take your pliers and bend the next length of wire half way around the smallest part of the plier nose- this will create the nose piece of Potter's glasses.


After that, make another circular loop by bending- try to keep it around the same/similar size to the first one.


Next bend the remander of the wire around to create the final ring shape. Then loop around the other side of the glasses and pinch into shape. If you want to add Harry's Scar simply twist and bend the wire as shown in the image below. (You can tell I got slightly carried away, as I also drew a smiley on my thumb!) :)


Hope you enjoyed this quick tutorial- it's been a while! Keep the Creative Juices Flowing and don't forget to add me on my social media, or comment on these tutorials, all support is greatly appreciated. Thanks again!x
 
(Also thank you so much for 3,000 page views! It's incredible! Had no idea, that my blog would ever get anywhere near that! ;) x)

Friday, 15 August 2014

Egyptian Style Wire Rings

Hello everyone!
Sorry, it's been a while! I aimed to post more often this holiday and that seems to have been forgotten! But to make up for the lack of posts I have a few wire ring ideas!! 
 
So before we begin you will need some supplies;
~Thick wire preferably about 0.6-0.8mm,
~Round nose pliers,
~Scissors,
~Some pretty coloured beads!


To start with all of these rings cut about 15cm of wire.

1. For the first wire ring (pictured on ring finger), take your wire and thread one bead into the centre. Wrap one end of the wire around half of the bead and repeat with the other side. (Both ends should have swapped places) Then wrap the wire around a pen three times, cut to the appropriate length and loop the edges in opposite directions.

2. For the second ring (pictures on the middle finger) take your wire and continuously loop around the smaller end of the pliers, changing the direction that you do it in everytime. Once you have completed this to the appropriate length, bend the wire around the edge of the first loop that you created.

3. For the third and final ring (pictured on the first finger) thread a bead onto the wire and wrap around a pen. Then adjust to your finger size, cut to appropriate size and bend both ends of the wire into interlocking loops.

These rings look incredible and hopefully give you some ideas! So sorry that I haven't had time to post recently will be working on new ideas for the time being!

Keep the Creative Juices Flowing! Enjoy!!x