Showing posts with label Cute. Show all posts

Saturday, 7 March 2015

Pen Pal Letter DIY


Hi everyone,
Recently I have been receiving letters from some pen pals. Some that my friends and I had received  were really creative and so inspired us to jazz up our own. So I thought I'd share exactly how I made my letter, please note that I am not a card maker so I was quite a novice at this!
Firstly the dress was made using origami and some pink scrapbooking paper that I had left. Instructions can be found here! The mini hanger that was attached to the dress was created using a paper clip, anyone that is on Pinterest may have already seen this pin;
 
http://www.agusyornet.com/2013/11/mini-hangers.html
 
The main letter/card was also made with scrapbooking card that I cut down to size using scissors and folding in half. Washi tape was applied along the top edge of the card. I used picmonkey.com to create and print out the heading, and odd embellishments to finish off the letter. I then glued my main letter into the centre of my card and Voila! 

 
Hope you enjoyed this really quick post, sorry it was a bit short! Keep the Creative Juices Flowing and as they say in French...
Au revoir!!x

Sunday, 15 February 2015

Little Jewellery Chest DIY


Hi everyone! I'm here with a new tutorial, a mini jewellery chest. After a good hunt around my local Hobby Craft I bought a few things ready for this little project of mine;
- A Paper Mache Chest,
-Decopatch Paper of my choice,
-Decopatch Glue,
-Paint Brush,
-Lace/ribbon.


Firstly, I coated an area of my chest in decopatch glue, and tore my paper into small squares (your can also cut if you want to be precise, but the overall finish in no different).


Then I applied my paper square and added another layer of glue on top using the brush to smooth out any corners/ edges.
 
I continued to 'decopatch' all over my object until it was completely covered in paper.
Finally, decorate how ever you want. I added a lace border and bow to the front!
 
Hope you enjoyed this quick DIY tutorial, remember to follow me via my social media links and comment if you liked this post- it's really appreciated! Keep the Creative Juices Flowing! :) x


Tuesday, 4 November 2014

Harry Potter Polymer Clay Tutorial


Hello internet lovelies! Today I'm posting a new Polymer Clay tutorial- now I know its not a weekend, but I really wanted to post this as soon as possible. So lets get started...
 
There are a few things that you will need however, before we begin:
~Polymer Clay (Fimo or Sculpey will do) in Translucent, pale peach, black, grey, brown, white and any other colours you may need if your adding other details,
~Tools, in order to help you model and cut the clay,
~Wire (any colour will do),
~Eyepin and other jewellery components.


To start take your peach and translucent clay and mix into quite a large ball. Try not to get many dust fibres on the clay, as they are easily noticeable. This ball will be Harry's head.

 
Next take your grey clay and mix with a SMALL amount of the black clay (if too much is added the grey will also become black), in order to slightly darken it. Roll the new colour into a thick, short sausage with flat ends and attach to the head.


After that add legs using the same grey colour, by rolling into smaller, thinner sausages. Attach these to the bottom of the body, and make sure that they're in proportion!


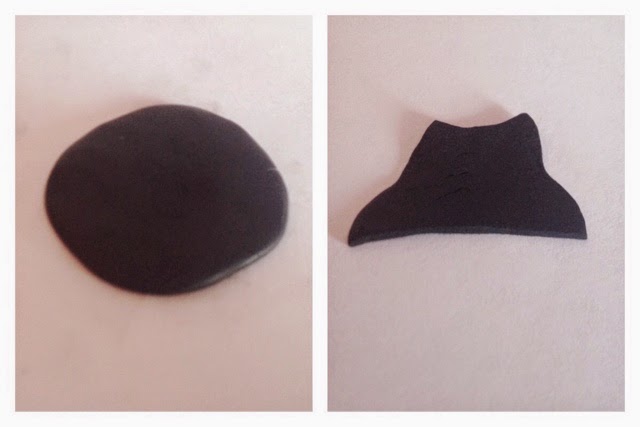
Time to make the robe... Take the black clay and flatten into a pancake. Cut a sort of trapezium shape as pictured above, with the bottom being longer than the top.


Then position onto Harry's body. Add arms to the robe, also using black clay and roll small peach balls as the hands. The body now has its shape.

 
Before you bake, add details such as brown shoes and a Gryffindor tie (Mine wasn't really a success!), glasses (bent wire), a collar out of white clay, and also the hair. When doing the hair its a good idea to look at an image; this ensures that the direction is as accurate as possible.


Once your character has baked add eyes, a mouth and Harry's scar using black and white acrylic paint. I also added small wands and harry potter books using this post here.
 
Hope you enjoyed this tutorial! I also did a Ron and Hermione, pictured below. Please share and comment if you enjoyed, its greatly appreciated. Keep the Creative Juices Flowing! See you very soon! :)

Friday, 31 October 2014

DIY Notebook


Hello internet lovelies!! I've got another tutorial this week- DIY notebook, with an idea to "cheat" book binding without thread!
Before we start you will need a few things that you will probably find around the house in your craft supplies;
~Hot Glue Gun,
~Glue Sticks,
~A wad of paper (whatever size you would like I use A4),
~Cardboard (any thickness will do),
~Fabric of your choice (this will be the cover so choose wisely!)
~Embelishments of your choice,
~Large paper clip (not completely necessary but it helps).


So to begin take your wad of paper, this can be as many or as little as you want, and begin to fold in half. I used A4 sheets so my final notebook is aproxiamately A5 size- keep this in mind when choosing your paper size.


After that group the folded edges together and use the paper clip to keep all of the sheets in position. Make sure that you don't push the paper clip all of the way down, else the paper will scratch when it is removed.


After that take your glue gun and melt glue over the folded edges. This can be done by applying in a zigzag motion and then spreading out over all pages. Make sure that you hold the edges close as you do this to ensure the best final result.


If you would like a bookmark/page marker, glue a ribbon onto the spine. Make sure that the ribbon is quite long (at least double the length of the spine) to ensure that the bookmark reaches the ends of the pages.


Next measure your paper pages and cut out 2x cardboard rectangles. These should be approx 5mm bigger than the sheets as these will be your outer covers. Also cut a cardboard spine, about the same size as the glued one. Cut your fabric to an appropriate size leaving a large border around the edge.

After than lay them out, as pictured below over your fabric and glue into position. Fold the border of the fabric and glue to the cardboard rectangles.


Then glue your paper pages onto place by glueing both the paper and cardboard spines together, hold into place until dry and secure. This step may take quite a bit of glue and patience in order to keep in position, however the results are impressive.


Once you have finished the main body of your notebook, take some spare scrapbooking paper, cut to size and glue over the rough edges of the fabric boarder, and the first page. This just adds a more professional look the the final product, and also adds some strength. However it is optional.


Finally add your chosen embellishments onto the front cover and fill with all sorts of ideas and jottings! Enjoy! Hopefully you enjoyed this tutorial, if so please share and comment, it's really appreciated. Also tweet me some of your notebooks via my social media to the top left colomn of my blog, I would love to see some! Keep the creative juices flowing! :) 


Friday, 24 October 2014

DIY Polymer Clay Unicorn


Hello everyone!! I'm here with a new tutorial- make your own polymer clay unicorn! 
Before we start there are a few things you'll need;
~White Polymer Clay (Fimo or Sculpey either will do),
~Pink, Blue and purple polymer clay (these three colours can be any really, these are just the ones that I used in this tutorial),
~Acrylic paint white and black,
~Tools (eg. Exacto knife, rolling pin etc...).


Roll out a large ball of white clay- as this will be your main unicorn body. Also roll out three smaller balls from the other colours of clay that you chose.


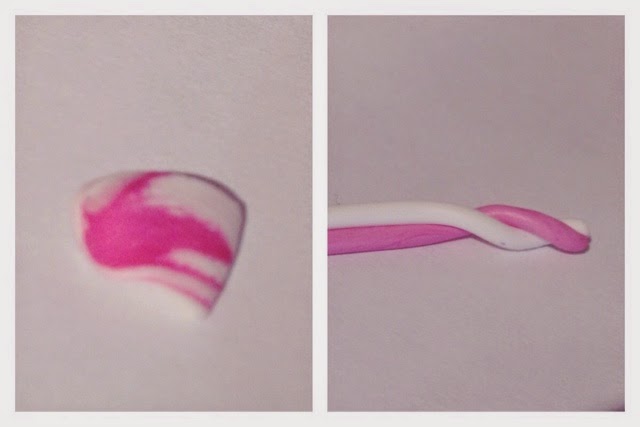
Mix pink clay and white together in order to lighten the colour. Then cut another smaller piece of white clay and roll both out Ito a sausage shape. Twist them together like in the image above (this will be the unicorn horn) and cut at a point where the horn will look like a cone shape.
 

Next take about just under half of your white clay, roll into a ball and sculpt so that one end is thinner and more pointed than the other. Add your unicorn horn on top by pressing firmly (make sure you don't squash your creation at this stage).


After that start on the body. Take most of your remaining clay (leave enough for arms and legs) and shape so that, like the head, one end is thinner than the other - make sure that both ends are flat. Add the head to the top of the thinnest side.


Roll out the remaining white clay into a sausage and cut into 4 appropriate lengths. Position them onto the body as shown above.


Once you have done that begin to add hair strands of rolled up clay onto the head and gently curve round to give the impression of waves in the hair. Use your coloured clay to do so.


Once you have completed the hair your unicorn is ready to go in the oven and bake! Make sure your happy with it and follow the instructions on your packaging. Add eyes using acrylic paint and voila!! 

Hope you enjoyed this tutorial, it's been a while since I uploaded a polymer clay tutorial! Sorry about the dust on the white clay on the pictures, it can't really be helped. See you next time, keep the creative juices flowing! ;)

Friday, 15 August 2014

Egyptian Style Wire Rings

Hello everyone!
Sorry, it's been a while! I aimed to post more often this holiday and that seems to have been forgotten! But to make up for the lack of posts I have a few wire ring ideas!! 
 
So before we begin you will need some supplies;
~Thick wire preferably about 0.6-0.8mm,
~Round nose pliers,
~Scissors,
~Some pretty coloured beads!


To start with all of these rings cut about 15cm of wire.

1. For the first wire ring (pictured on ring finger), take your wire and thread one bead into the centre. Wrap one end of the wire around half of the bead and repeat with the other side. (Both ends should have swapped places) Then wrap the wire around a pen three times, cut to the appropriate length and loop the edges in opposite directions.

2. For the second ring (pictures on the middle finger) take your wire and continuously loop around the smaller end of the pliers, changing the direction that you do it in everytime. Once you have completed this to the appropriate length, bend the wire around the edge of the first loop that you created.

3. For the third and final ring (pictured on the first finger) thread a bead onto the wire and wrap around a pen. Then adjust to your finger size, cut to appropriate size and bend both ends of the wire into interlocking loops.

These rings look incredible and hopefully give you some ideas! So sorry that I haven't had time to post recently will be working on new ideas for the time being!

Keep the Creative Juices Flowing! Enjoy!!x

Thursday, 24 July 2014

DIY Vintage Sewing Machine Polymer Clay Tutorial


Hi everyone!
Recently I have grown a love for old sewing machines- in particular the famous Singer sewing machine. This inspiration lead to this treasure of an idea! In this tutorial I will show you how to make your own polymer clay model which can be adapted into a piece of jewellery or an ornament.
 
Before we start you will need a few things;
~Black, Brown and Silver effect polymer clay,
~Eye Pins,
~Permanent Marker Gold and Silver Pens,
~Printed Logo,
~Super Glue.
 
(click to enlarge images)
 
To begin take your black clay and roll in a ball to soften(1) for this tutorial you will need slightly more than in other tutorials.
 
Next roll the ball into a thick sausage shape(2) and bend around 1/4 from the right hand side to make a shape that looks a bit like a gun(3), and slightly flatten the end facing downwards.
 
Take the left end of the sausage and pinch upwards and downwards (looking at an image helps with this step)(4) .
 
After that take another, smaller piece of black clay, roll into a sausage and then flatten into a long pancake shape(5).
 
Place the main sewing machine on top(6) and gently push to secure into place. Add eye pins and details and then bake for the time and temperature stated on the packaging of your polymer clay.
 
Once baked use your paint pens to add smaller details and print off the labels below (save the image below, then insert and resize as an a4 sheet of paper into word) and then varnish to complete.
 
Hope you enjoyed this tutorial as I haven't done a polymer clay post in some time! Keep the Creative Juices flowing! New posts will be added regularly through the holidays so keep checking back!x

Friday, 11 July 2014

DIY Hearts Wire Ring


Hello everyone!
This is just another quick wire ring tutorial before my main weekend one. This tutorial will help you to create your own hearts adjustable wire ring-and its really simple and easy to do!
 
There are a few main pieces of equipment that you will need in order to begin(1);
~Wire of any colour you wish (mine is a 0.6mm thickness),
~Round Nose Pliers,
~Scissors
 
 
To begin, cut approximately 15-20cm worth of wire and position your pliers about 1cm from the end(2)(this will make the one side of your first heart).
 
Then begin to make a medium sized half loop by bending the wire around your pliers(3).
Then bend the wire backwards so that it is facing the opposite direction to step3, and squeeze into place (4). 

 
Make another half loop to create the other bend in a heart and join the first end to the other wire with a slight twist using the pliers (5).
Next take the end of the wire that you have been working on and bend it around a makeup lid or something curved(6).
 
Make the second heart using the previous steps(7) and cut off the excess wire.
Now you have a ready-to-wear ring that looks fabulous!(8)
 
Hope you enjoyed this really quick post! Keep the Creative Juices Flowing! Enjoy!x
 
Feel free to like or share any of my posts and follow me on my social media! Much appreciated! Thank you for making this blog a success!x


Sunday, 29 June 2014

Love DIY Wire Ring


Hello everyone,
This tutorial will help you to make your own wire ring, which spells out love, (shown on the ring finger on the picture above). I know that there are loads of these tutorials online, but this again is my own and I have tried to find the easiest possible ways to make something that looks incredible. This project should only take 5-15 minutes.

So, before we start you will need(1);
~Wire (mines a 0.6mm thickness bought from Hobby Craft),
~Round Nose Pliers (any pliers will do, but round nose give better results on curves),
~Scissors.


(click on the images to enlarge)

To begin, take your wire and cut it approximately between 15-20cm, the longer the wire piece the more  you have to work with, but also more excess waste. Take your pliers and make a loop at the end of the wire piece (2). This can be done by wrapping the wire around the one side, making sure you move the plier as you do so. Once you have done this you should end up with a small loop(3), take your pliers again and make a slightly bigger loop (the nearer to the end of the plier nose, the smaller the loop will be), further along the wire(4) (this is the start of the letter 'L'). At this point make sure that the wire is pointing towards you.


Next make a small loop where you would like the corner of your 'L' to go (5)(only loop around your pliers once) and make sure that your wire faces back to its original direction(6). After that you should see your ring start to take shape. Make another loop (trust me there are many more loops to come), this one should be slightly bigger than the others(7). Make sure that after this step your wire is pointing upwards(8).


Take your wire at the point just after the 'O' and bend so that the wire points downwards. Then bend again at an angle to create the 'v' (9) and then again so that the wire points horizontally(10). This time take your pliers under your wire ring and bend into a letter 'e' (11). Your 'Love' wording is now complete.


Finally (sorry about the picture quality, I couldn't get a clear picture it was that small), bend the excess around a cylinder object like a lipstick top or something lying around. Measure the ring against your finger and thread the other side of the wire through a loop (13), normally I would thread it through the first loop, however it did not sit properly on my finger, so I threaded it through the bottom one instead.

Use your scissors to cut the wire down and use your pliers to loop (again) the threaded wire around, this stops any sharp edges scratching your finger. 


Your ring is now ready to wear (sorry if those instructions were confusing in parts, the pictures should help). I am hopefully going to post more of these jewellery making projects, If you liked this or any other tutorials be sure to share and comment as it is much appreciated. And if you are a loyal follower of my blog follow me on any of my social media or subscribe to my feed to ensure that you do not miss out on any crafty ideas and projects! 

Keep the Creative Juices Flowing! Enjoy!x

Saturday, 14 June 2014

Ice Skate Polymer Clay Tutorial


Hello everyone, 
I'm back with a new tutorial! Recently I tried to find an online tutorial on how to make an Ice Skate charm- however I could not find what I was looking for. So here we have my own tutorial! Hope you enjoy!

Before you begin you will need these things;
~White, Brown and Grey Polymer Clay,
~Super Glue,
~Jewellery Findings,
~Emroidery Floss (any colour you wish),
~A Range of Modelling tools.

(click images to enlarge)

To start take your clay and roll each colour into balls(1), then mould the white clay into a foot shape by pressing and rolling the one side(2). Once your white foot is done add a small oval indentation at the top of the thickest part of the foot(3) (this will be the end where you would put your foot in).


Next roll out the brown clay and place your clay foot on top(4), then cut around the outer shape of the clay foot(5). Press the brown clay to the underneath of the sole and add a brown clay heel(6). To prepare the grey skate, roll a sausage of grey clay in proportion with the rest of your clay ice skating boot(7).
 

Add the grey sausage onto the sole of the boot and mould into a hook at the toe end(8). Add and eyepin and bake using the instructions on your clay packaging. I usually put my Fimo in for 20-30 mins on 110 degrees Celsius(8). Once your clay is baked and cooled position the clay skate blade in some blue tack. This will help to position the charm as you add the floss laces.


 Take your super glue and dab a spot 3/4 of the way down the clay boot, towards the toe. Quickly position the centre of your embroidery floss on top of the glue(9). Do the same thing repeatedly in a zig-zag pattern to the top and don't forget to pull the threads tightly(10). Finish off by tying a bow and glue it in place(11). Once everything is in place and dry you can add a lobster clasp or other findings and varnish it for a shiney finish.


Hope you liked this tutorial! Be sure to share and comment! Also add me on my social media, Keep the Creative Juices Flowing! Enjoy!x