Showing posts with label Fimo. Show all posts

Friday, 24 October 2014

DIY Polymer Clay Unicorn


Hello everyone!! I'm here with a new tutorial- make your own polymer clay unicorn! 
Before we start there are a few things you'll need;
~White Polymer Clay (Fimo or Sculpey either will do),
~Pink, Blue and purple polymer clay (these three colours can be any really, these are just the ones that I used in this tutorial),
~Acrylic paint white and black,
~Tools (eg. Exacto knife, rolling pin etc...).


Roll out a large ball of white clay- as this will be your main unicorn body. Also roll out three smaller balls from the other colours of clay that you chose.
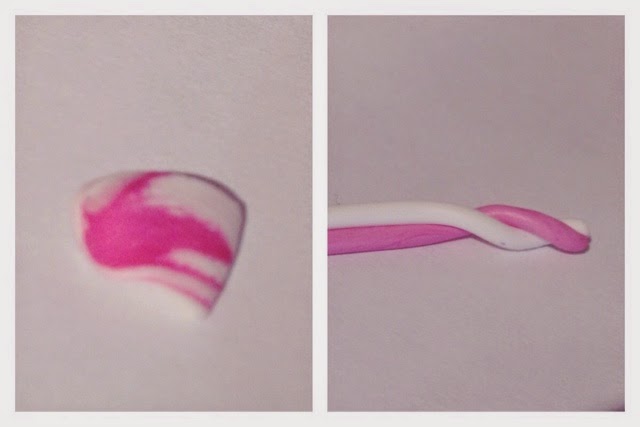

Mix pink clay and white together in order to lighten the colour. Then cut another smaller piece of white clay and roll both out Ito a sausage shape. Twist them together like in the image above (this will be the unicorn horn) and cut at a point where the horn will look like a cone shape.
 

Next take about just under half of your white clay, roll into a ball and sculpt so that one end is thinner and more pointed than the other. Add your unicorn horn on top by pressing firmly (make sure you don't squash your creation at this stage).


After that start on the body. Take most of your remaining clay (leave enough for arms and legs) and shape so that, like the head, one end is thinner than the other - make sure that both ends are flat. Add the head to the top of the thinnest side.


Roll out the remaining white clay into a sausage and cut into 4 appropriate lengths. Position them onto the body as shown above.


Once you have done that begin to add hair strands of rolled up clay onto the head and gently curve round to give the impression of waves in the hair. Use your coloured clay to do so.


Once you have completed the hair your unicorn is ready to go in the oven and bake! Make sure your happy with it and follow the instructions on your packaging. Add eyes using acrylic paint and voila!! 

Hope you enjoyed this tutorial, it's been a while since I uploaded a polymer clay tutorial! Sorry about the dust on the white clay on the pictures, it can't really be helped. See you next time, keep the creative juices flowing! ;)

Thursday, 24 July 2014

DIY Vintage Sewing Machine Polymer Clay Tutorial


Hi everyone!
Recently I have grown a love for old sewing machines- in particular the famous Singer sewing machine. This inspiration lead to this treasure of an idea! In this tutorial I will show you how to make your own polymer clay model which can be adapted into a piece of jewellery or an ornament.
 
Before we start you will need a few things;
~Black, Brown and Silver effect polymer clay,
~Eye Pins,
~Permanent Marker Gold and Silver Pens,
~Printed Logo,
~Super Glue.
 
(click to enlarge images)
 
To begin take your black clay and roll in a ball to soften(1) for this tutorial you will need slightly more than in other tutorials.
 
Next roll the ball into a thick sausage shape(2) and bend around 1/4 from the right hand side to make a shape that looks a bit like a gun(3), and slightly flatten the end facing downwards.
 
Take the left end of the sausage and pinch upwards and downwards (looking at an image helps with this step)(4) .
 
After that take another, smaller piece of black clay, roll into a sausage and then flatten into a long pancake shape(5).
 
Place the main sewing machine on top(6) and gently push to secure into place. Add eye pins and details and then bake for the time and temperature stated on the packaging of your polymer clay.
 
Once baked use your paint pens to add smaller details and print off the labels below (save the image below, then insert and resize as an a4 sheet of paper into word) and then varnish to complete.
 
Hope you enjoyed this tutorial as I haven't done a polymer clay post in some time! Keep the Creative Juices flowing! New posts will be added regularly through the holidays so keep checking back!x

Saturday, 14 June 2014

Ice Skate Polymer Clay Tutorial


Hello everyone, 
I'm back with a new tutorial! Recently I tried to find an online tutorial on how to make an Ice Skate charm- however I could not find what I was looking for. So here we have my own tutorial! Hope you enjoy!

Before you begin you will need these things;
~White, Brown and Grey Polymer Clay,
~Super Glue,
~Jewellery Findings,
~Emroidery Floss (any colour you wish),
~A Range of Modelling tools.

(click images to enlarge)

To start take your clay and roll each colour into balls(1), then mould the white clay into a foot shape by pressing and rolling the one side(2). Once your white foot is done add a small oval indentation at the top of the thickest part of the foot(3) (this will be the end where you would put your foot in).


Next roll out the brown clay and place your clay foot on top(4), then cut around the outer shape of the clay foot(5). Press the brown clay to the underneath of the sole and add a brown clay heel(6). To prepare the grey skate, roll a sausage of grey clay in proportion with the rest of your clay ice skating boot(7).
 

Add the grey sausage onto the sole of the boot and mould into a hook at the toe end(8). Add and eyepin and bake using the instructions on your clay packaging. I usually put my Fimo in for 20-30 mins on 110 degrees Celsius(8). Once your clay is baked and cooled position the clay skate blade in some blue tack. This will help to position the charm as you add the floss laces.


 Take your super glue and dab a spot 3/4 of the way down the clay boot, towards the toe. Quickly position the centre of your embroidery floss on top of the glue(9). Do the same thing repeatedly in a zig-zag pattern to the top and don't forget to pull the threads tightly(10). Finish off by tying a bow and glue it in place(11). Once everything is in place and dry you can add a lobster clasp or other findings and varnish it for a shiney finish.


Hope you liked this tutorial! Be sure to share and comment! Also add me on my social media, Keep the Creative Juices Flowing! Enjoy!x

Thursday, 12 June 2014

DIY Rose Ring


Hi everyone! This is a quick, easy tutorial that will teach you how to make your own rose ring.
Before you begin to make this creation you will need;
~Polymer Clay of your chosen colour,
~Super or Industrial Standard Glue,
~A Blank Adjustable Ring (can be purchased online on eBay, amazon etc.)

To start simply take your Polymer Clay and mould into a rose. There are a number of tutorials on other crafty sites. I used;


Once you have baked and made your rose flower you can either varnish it or leave it as it is. The next step is to glue it to your blank ring and then we have a quick, easy, finished ring! 

Other good ideas would be to make multiple roses and glue onto a blank ring like a bouquet! Hope you liked this simple tutorial! New tutorial will be coming soon! Keep the Creative Juices Flowing! Enjoy!x


Tuesday, 27 May 2014

Camera Polymer Clay Tutorial


Hi everyone, 
I'm back with another polymer clay camera tutorial. I made this charm to look similar to the canon T3i (I don't know much about cameras but this is the choice of many youtubers).

 Before you start you will need;

~Black Polymer Clay,
~A Range of Tools (preferably a straight blade and craft knife),
~Printout of Logos, Camera lense, and Picture. (found at bottom of post)

(click images to enlarge)

To begin take your black ball of clay (1) and shape it into a rectangular shape using the side of the straight blade to ensure a clean edge(2). Take your rectangle and roll making sure you do not roll to the very edge(3). This should make a curved, thick column on the left hand side(4). This is the main body of your camera charm.


Next roll a small sausage of black clay and add to the top (your logo will be placed here later)(5). Then make a circular pancake shape in proportion to your camera (this is the base of your lense) (6) and position in the centre of the main camera(7). After that mould another, slightly thicker pancake shape and score vertical lines all the way around for texture(8).


Then add this lense piece to the camera by positioning on top of the thinner pancake shape(9), it should start to look more like a camera. For the next step roll out a sausage(10) and press around the camera lense as a rim(11). You have now finished one side of your camera. Turn your model over and score, using a craft knife, a rectangle (12) you may also add buttons for extra detail.
 

Now simply slide in an eye pin on both sides and bake using the instructions on the back of the packaging(13). Once this is done you can print out some logos to glue on and then varnish for a shiney finish! 

Hope you enjoyed this tutorial! keep the Creative Juices Flowing!x
 
Here are the logos and printouts you will need. I did them in different sizes and will need to be copied, pasted and resized into an A4 document.
(click to enlarge)
 

Friday, 16 May 2014

Wolf Polymer Clay Tutorial


Hello everyone, recently a friend challenged me to make a dust plug wolf for her younger brother. This challenge inspired this blog post, and here we go! A tutorial on how to make your own wolf out of polymer clay!


Before you start it's handy to have the right equipment (it's a pain to have to stop half way!);
~Grey Polymer Clay (or any other colour if you choose),
~A craft Knife (Exacto knife),
~ Any other tools that may help,
~A range or white, black, and dark brown acrylic paints,
~Plastic Dust plug (if this is what you want).


Let's begin!! 
To start take your ball of grey clay (1) and half it, we will use the second ball later(2). We are going to begin with the front of the body (head and front legs). Take your ball and roll it on one side (3). 

This should leave you with a semi circular shape at the top and a slightly oblong shape at the bottom. Then mould the clay into two ears and a nose by pushing and pressing the clay into place(4).


Once you have your main body shape cut, using your craft knife, a triangle- this will make the front legs (5). You have now finished the front of the Wolf's body. Take your second ball of clay and roll into a flat sausage shape (6). Then slightly curve the clay to create the back legs(7).

(click on the images to enlarge)
 
Next cut another- slightly larger triangle to create the back legs. To make the bushy tail, roll out an excess piece of clay and roll one side thinly (8). Next add onto the back end of the body (9). You have now finished the basic modelling of your wolf now add both parts together (10).


Next paint like in the very first picture using a fine brush and acrylics. Remember to make the brush strokes look like fur, for added effect! Hope you enjoyed this tutorial! Keep the Creative juices flowing!x
 
Please post a comment if you enjoyed and follow me on my social media, Links below;
Follow Me on Google+
Follow Me on Bloglovin'
Follow Me on Twitter

Wednesday, 23 April 2014

Starbucks Coffee Polymer Clay Tutorial


Hi everyone, another polymer clay tutorial. Today is a Starbucks coffee tutorial, great for any coffee lovers out there. A number of tutorials can be found online but unfortunately non worked the way I wanted, therefore I made my own.

For this tutorial you will simply need:
~A Piping Nozzel,
~White Clay,
~Brown Clay,
~Translucent Clay (I used Fimo),
~A Craft Knife or Blade.


Firstly take your white clay and cut into a smaller piece as this will make it more manageable, and will not make the brown clay any lighter when we come to mix.

Next step is (as you probably guessed) to mix the brown and white clay, simply roll and twist. But you want it too have a swirly appearance so don't get carried away.

Once you have mixed your clay it should look like this. Roll into a ball and then into a sausage shape- making the ends flat.


Cut the clay to an appropriate size (out of this I can make two Starbucks coffee charms).


Then take your translucent clay and roll into a sausage shape, next cut to approximately the circumference of the coffee cup and position around the edge. (Tip: For the bottom position on the underside, as this will make the top look bigger and more realistic.)


After that feed your remaining white clay through the piping nozzle, this will make a creamy effect, and swirl on top of your coffee cup.

Finally add an eye pin or dust plug and mini straw, bake and add a printout Starbucks logo.
Keep the Creative Juices Flowing, Enjoy!x

Saturday, 19 April 2014

Minion Polymer Clay Tutorial


This tutorial is how to make a polymer clay minion, this can be made in different sizes and can be made into a range of pieces of jewellery and accessories (e.g. Key ring, dust plug, pendant). This post, like previous polymer clay tutorials is 100% my own and has been used to make pieces for my friends, the first minion was made from a picture.

For this tutorial you will need:
~Yellow Clay,
~Blue Clay,
~Black Clay,
~Grey Clay,
~White Clay,
~A Craft Knife,
~A Rolling Pin, 
~And jewellery findings.


Firstly take your clay colours (1) and roll them into balls (this will make it easier to handle when modelling), then take the yellow clay and roll into a sausage (2) making sure the ends curve slightly.


Next we need to add on facial features to our character, (3) thinly roll out the black clay and cut an amount that will go around the yellow sausage and leave a slight gap (4). Roll out a small ball of white clay and lightly flatten (5), this will make the base of the eye, and place in the gap made.


After that roll out another thin sausage with they grey clay and position around the outerside of the eye(6). You can also roll a small ball out of black clay to produce the pupil, or this can be painted on after baking. Another facial addition is a mouth, a craft knife can be used to add this on, but remember if you cut to far it cannot be easily undone.


Then roll out a very thin sausage of black clay again, this time cut several lengths and position on top of the head to create the Minion's hair (7).


Moving on to the body, roll out the blue clay and cut the ends as we will be using these (8). Place these onto the minion with the straight edge, in the centre of the body (9). Then use left over clay to make simple legs and arms and position in a pose (10+11).


Finally add your eyepin and your minion is ready to bake in the oven (use instructions on the back of your clay). I added a "Bapple" (apple) to my minion you may wish to add a "Banana" too!


Keep the Creative Juices Flowing, Enjoy!x


Thursday, 17 April 2014

Easter Decoration Polymer Clay


Hi everyone, just thought I'd share this little Easter decoration project. Sorry I do not have step by step pictures as I did not contemplate posting an Easter tutorial.
 But all of the animals have been painted and made in the Kawaii fashion, and the fence was simply 3 rolls of clay plaited together.
The apples in the tree were also easy to create as they are very simply balls of clay. I hope this gives you inspiration of your own, and is a lot more fun than just going to the shops!
 
Keep the Creative Juices Flowing, enjoy!x


Wednesday, 9 April 2014

Winnie the Pooh Polymer Clay Tutorial

Here is my tutorial on how to make a Winnie the Pooh polymer clay character. I used the picture below (which I found on google) to create my pendant, adding the features which I felt were important.

Firstly to create the head, roll out a medium ball of yellow clay and pinch one side to make a nose-like shape. This will also produce an indentation for the eyes.


When your happy with the shaping of your head use two smaller yellow balls of clay and a black ball of clay,to make the ears and nose.


In order to create the body make two semi spherical shapes out of yellow and red clay (by cutting a ball in half) and press together, mine seemed to make a mushroom kind of shape?


Then if you feel adventurous add eyebrows to the head. And position the two body parts together. Then add a collar and sleeves to the body, this will produce Winnie's t-shirt.


Next start to add limbs. These can be made by creating an oval shape and sausage shape, and moulding them together.


Once all of your limbs have been created you can position them onto the body and add eyes (these can be painted after baking using acrylic paint, if you wish). Finally place  your clay creation into the oven to bake following the instructions on your chosen polymer clay. Your final product can be varnished to add strength or left if you prefer.😊

Hope you enjoyed!x