Showing posts with label themed. Show all posts

Wednesday, 24 December 2014

MERRY CHRISTMAS!


Merry Christmas!!! Hello everyone! Here is my Christmas post special along side a five of my own Christmas crafts and DIYs that have been made over the years!

Firstly this plain,wooden 'Noel' sign was cheaply purchased and then decopatched in lovely Christmas paper- it looks great and rivals some signs you may find in some shops.


Next, this groovy tree was handmade by my lovely nan. The base is firm in order to weigh the tree down and the tree itself was sewn and then stuffing was used in order to 'plump it up'


These jolly snowmen were also decopatched, after picking up the paper mâché plain version from hobby craft a few years ago (I think they still do them around this time of year). I must admit they look quite scary in this image!


This 'Let it Snow' sign was anoth decopatch project and is simply positioned onto the wall using blue-tack.


Finally, my festive cushions! These were sewn using Christmassy fat-quarters and then also stuffed. They look fabulous under the tree and fill up any space that has not be used by presents!

Hope you enjoyed this quick post on Christmas Eve!! Hope you all have a wonderful Christmas and new year! Keep the Creative Juices Flowing! :) x

Tuesday, 4 November 2014

Harry Potter Polymer Clay Tutorial


Hello internet lovelies! Today I'm posting a new Polymer Clay tutorial- now I know its not a weekend, but I really wanted to post this as soon as possible. So lets get started...
 
There are a few things that you will need however, before we begin:
~Polymer Clay (Fimo or Sculpey will do) in Translucent, pale peach, black, grey, brown, white and any other colours you may need if your adding other details,
~Tools, in order to help you model and cut the clay,
~Wire (any colour will do),
~Eyepin and other jewellery components.


To start take your peach and translucent clay and mix into quite a large ball. Try not to get many dust fibres on the clay, as they are easily noticeable. This ball will be Harry's head.

 
Next take your grey clay and mix with a SMALL amount of the black clay (if too much is added the grey will also become black), in order to slightly darken it. Roll the new colour into a thick, short sausage with flat ends and attach to the head.


After that add legs using the same grey colour, by rolling into smaller, thinner sausages. Attach these to the bottom of the body, and make sure that they're in proportion!


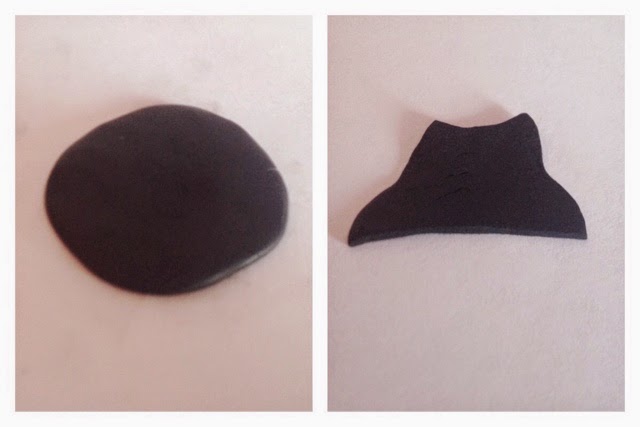
Time to make the robe... Take the black clay and flatten into a pancake. Cut a sort of trapezium shape as pictured above, with the bottom being longer than the top.


Then position onto Harry's body. Add arms to the robe, also using black clay and roll small peach balls as the hands. The body now has its shape.

 
Before you bake, add details such as brown shoes and a Gryffindor tie (Mine wasn't really a success!), glasses (bent wire), a collar out of white clay, and also the hair. When doing the hair its a good idea to look at an image; this ensures that the direction is as accurate as possible.


Once your character has baked add eyes, a mouth and Harry's scar using black and white acrylic paint. I also added small wands and harry potter books using this post here.
 
Hope you enjoyed this tutorial! I also did a Ron and Hermione, pictured below. Please share and comment if you enjoyed, its greatly appreciated. Keep the Creative Juices Flowing! See you very soon! :)

Monday, 20 October 2014

Harry Potter Inspired Rings


Hello everyone, I'm back with another post- how to make your own harry potter inspired wire ring! Next month I will be visiting the Harry Potter Warner Bros studios in London.....As you can probably guess I'm very excited, and will be uploading a few more posts.
So, before we begin you will need;
~Wire of a decent thickness (any colour you like),
~Scissors,
~Round Nose Pliers.


Cut around 10-15cm of wire, you will have a lot of excess, however this can be used in future craft projects. After all it's better to have more than enough, rather than to run out mid-creation.


Take one end of your wire and produce a circular shape, by bending the wire twice around the thickest part of you pliers.


Next, take your pliers and bend the next length of wire half way around the smallest part of the plier nose- this will create the nose piece of Potter's glasses.


After that, make another circular loop by bending- try to keep it around the same/similar size to the first one.


Next bend the remander of the wire around to create the final ring shape. Then loop around the other side of the glasses and pinch into shape. If you want to add Harry's Scar simply twist and bend the wire as shown in the image below. (You can tell I got slightly carried away, as I also drew a smiley on my thumb!) :)


Hope you enjoyed this quick tutorial- it's been a while! Keep the Creative Juices Flowing and don't forget to add me on my social media, or comment on these tutorials, all support is greatly appreciated. Thanks again!x
 
(Also thank you so much for 3,000 page views! It's incredible! Had no idea, that my blog would ever get anywhere near that! ;) x)

Sunday, 22 June 2014

Harry Potter Inspired Spellbook DIY


Hello Everyone!
Ok in my last post I lied, here is another tutorial, again inspired by possibly my most favourite series of films- Harry Potter. Before we start you will need:
~Paper,
~One Piece of Card,
~A Computer and Printer,
~The pictures at bottom of page on an a4 resized File
(print with page1and 4 on outer side of 2 and 3etc.)
~Coffee,
~water,
~Glue gun and Sticks,
~Fabric look-a-like leather (any strong, dark fabric will do)


To begin print the pictures and fold in the centre. This will make it easier later.
Gather your coffee, brush and water and paint the paper on both sides. (you can use tea if you wish, coffee just has a stronger colour). Its a good idea to use a hairdryer to help speed up the process.


Once you have applied your first layer add another, this time darker and only around the edges; it's a good idea to use the hairdryer again- so keep it on the side. When you have finished with the coffee and everything is dry, cut around the pale peachy outlines and refold along the centre lines.

 
Next we are going to start assembling the spell book. Take your fabric and cut it to a similar size to the pages. Then take your card (I used a light yellow colour card for this and it worked well), fold down the centre and glue to the back of your fabric cover.

 
After that take the folded edges of your paper pages and line them up. Glue gun along the top and make sure that non of the pages fall out when you flick through.

 
Your nearly finished! Simply glue the spine of the pages into the centre fold of your card and voila!
The very last step is to add the title of your book onto the front, I simply used gold and silver marker paint pens. Once they were dry I lightly rubbed over the word to make them look distressed and old.


 Hope you enjoyed this tutorial! Keep the Creative Juices Flowing! Enjoy!x

Monday, 21 April 2014

Harry Potter Inspired Wands


This project was inspired by my inner fan, as I hear that official replicas are often expensive. By using supplies that I found around the home and multiple online tutorials I found a way to create my own professional looking props.

By using simply using a hot glue gun on a chopstick, and then using wooden shades of acrylic paint, they were not only cheap and easy but they dried quite quickly! The box was simply made by cutting a box net from cardboard and again painting, I also stuck on labels which were found online (if you're a fan then you might recognise the name). 

Hope this gives you some ideas! keep the Creative Juices Flowing!x


Sunday, 13 April 2014

Harry Potter Inspired Potion Charms

                        
This tutorial shows you how to make your very own Harry Potter Potion charms or pendants. I made Dragon Blood, Ogre Snot, and Mermaid tears as I have previously made Polyjuice, Felix Felicis and Love potion. BEWARE THIS CAN GET MESSY!

Before you start this project you will need a variety of products; some may need to be purchased at a craft store or online:
~Small Glass Vials (I purchased mine on eBay, and are widely available in different shapes and sizes),
~Clear Glue (it is important that this is CLEAR glue, white glue that dries clear won't work, and the finished product won't look right),
~A Range of Different Coloured Food Colourings (you may find these at the back of your cupboard),
~A Small Stirring stick (I used a small wooded stick),
~Access to a Computer and Printer,
~Newspaper or Kitchen roll.
                                  

Firstly cover your surface in either Newspaper or Kitchen roll to avoid staining whilst using food colouring. Take your clear glue and squeeze into your vial to about 3/4 of the way.


Next take your food colouring and add as much or as little as you wish (the more you pour in, the darker your potion will look), then use the stirring stick to mix the food colouring into the glue. (This stage can be messy).


After that you can add your cork to the top.


Experiment with different colours to create different potions. When you are finished add the hook and labels, which you can make your self or find on the internet, and show off you make!

Keep the creative juices flowing!